Thursday, 26 July 2012

Love it or Hate it

Marmite - it is either your worst enemy or your best friend. It is almost a universal divider, as people either eat it religiously or turn away from it in disgust. No one is on the fence about it! My household is divided 75/25, as myself, my mum, and my brother all love marmite, while my dad can't stand the stuff (or so he says - he has been known to eat entire bowls of marmite spaghetti)!

Marmite lovers will therefore love this recipe as it involves a rather large amount of it. (I'm not entirely sure how to refer to marmite! What exactly is it classed as - a sauce, a spread; its a difficult one!) Obviously if you don't like it then this recipe isn't really one for you!

This recipe is for Marmite Pinwheels and is a bit of a cheat as it uses ready-roll puff pastry! Now before anyone says anything, I make all my own short crust pastry without a second thought but puff just seems to be such a faf! How many cookbooks have you read that actually tell you to make your own puff pastry?! If Nigella isn't ashamed of it then neither am I!

The ingredients:

 Ready-roll puff pastry, marmite, cheese, and an egg (plus flour for dusting).

Lightly flour an appropriate work surface and roll out the pastry.
 Spread the marmite all over the pastry (be patient with this!), leaving a gap of about 1cm around the edges.
 Sprinkle the cheese all over the marmite.
 Beat the egg, and then brush the edges of the pastry. 
 Roll the pastry up from the longest end so as to create a marmite-cheese sausage.
 Brush the entire thing with beaten egg and then cut into reasonably thick slices. Arrange the slices on a lined baking tray and bake in the oven for around 15 minutes.
 When cooked they will be a nice golden brown colour and can be removed from the oven and left to cool. The marmite can ooze slightly!

These can be eaten warm but make sure you don't burn yourself as the cheese will be extremely hot!

So now I am intrigued - who out there is a fan of marmite and who isn't? Let me know!

Kate
xxx

Tuesday, 24 July 2012

It might not be much to look at...

...but it tastes amazing! Trust me!

I saw the recipe for this cake (a cinnamon cake to be precise) quite a while ago and kept telling myself I should make it but I kept forgetting to buy two of the key ingredients, soured cream and sunflower seeds. Having finally got round to making it I am just gutted I didn't make it sooner! 

It is another quick and easy recipe that I urge people to try! It might be a bit boring to look at, but it certainly isn't to eat! Give it a go and I am sure you will love it just as much as I do! 

The ingredients:

 Butter, caster sugar, eggs (beaten), cinnamon, self-raising flour, bicarbonate of soda, soured cream, and sunflower seeds

Into a bowl goes the butter and caster sugar, which need to be creamed together until light and fluffy, and then gradually add the beaten eggs.
 Next, sift in the flour, bicarbonate of soda, and cinnamon, and fold in with a metal spoon.
 Then add the soured cream and sunflower seeds and mix until everything is well combined. 
 Spoon into a baking tin (I use silicone but if you don't, then don't forget to grease and/or line your tin!) and smooth the surface over. 
 Place in the oven and bake for 45 minutes. Once out, gently ease the cake out of its tin and leave to cool on a cooling rack. 
 And there you have it! Cut it into pieces and enjoy! 

It is a really moist cake and extremely moorish so be careful when eating, or you might wonder where your entire cake went!

It is a baking day today, so make sure you keep an eye on what's coming up on here over the next few days - there should be some very tasty treats!

Kate
xxx

Celebrate with Flapjack

Hello!

Firstly I must apologise for my serious lack of blogging! I have had a few stressful days recently and as a result my blog has fallen by the wayside a bit. However, the stressful days have been worth it because I have some excellent news!

Keeping fingers (and in fact everything else) very firmly crossed, it would appear I have premises for Delicious Decadence! There was a slight disagreement over legalities so it was a bit touch-and-go but that has now all been cleared up! Not to say that it is a definite though! There is still a long way to go before the place is actually mine!

Possibly jumping the gun slightly, but I've started buying all sorts of things - coffee cups, cushions, artwork, and various other items! It is all rather exciting! As things continue to progress I will keep you informed in more detail!

To celebrate the news (although its not quite time to open the champagne just yet!) I thought I'd blog one of my favourite things, Cherry and Almond Flapjack. It is extremely tasty and easy to make (I've put the full recipe on my recipe page) and I very much recommend you try it. Another plus is that when kept in an air-tight container it will keep for quite a while! Although, everything is better fresh!

The Ingredients:

 Brown sugar, butter, golden syrup, glace cherries, almond extract, and oats.

Into a bowl put the sugar, butter, golden syrup, and almond extract, and place in the microwave to melt.
In another bowl put the oats and the glace cherries (chopped into halves).
Pour the liquid ingredients into the dry ingredients and mix thoroughly.
Tip the mixture into an appropriate tin (I always use this silicone one) and flatten it all down so it comes out nice and even, then place in the oven to bake.
And there you have an awesomely sweet and sticky treat to enjoy! 


Thanks for reading and keep doing so in order to learn of my progress!

Kate
xxx

Sunday, 15 July 2012

It's a Small World

I love all things miniature from animals to furniture! Therefore, making food in miniature forms is one of my favourite things to do and has kind of become my specialty. One of my favourite things I've ever bought is my miniature victoria sandwich tins! This post includes two different varieties of mini loaf cake for you to enjoy, Honey and Pine Nut, and Chocolate and Pear. Enjoy!

First, Honey and Pine Nut Loaf Cakes

The Ingredients:
Light brown sugar, sunflower oil, soured cream, plain flour, an egg, baking powder, a pinch of salt, honey, and pine nuts.

So, into a bowl put the egg, sugar, oil, soured cream, and honey. 
Mix it all together. 
Next gradually add the flour, salt, and pine nuts and mix together until it is just combined.
Add the baking powder and mix it together really well.
Grease and flour five or six miniature loaf tins.
Spoon the mixture into the prepared tins and sprinkle more pine nuts on top, then place in the oven (180 degrees centigrade, or fan 160, Gas Mark 4) and bake for around 25 minutes.

Second, Pear and Chocolate Loaf Cakes

The Ingredients:
Light brown sugar, sunflower oil, creme fraiche, plain flour, an egg, baking powder, a pinch of salt, a pear, and chocolate chips.

The method for these cakes is pretty much the same as the method for the honey and pine nut cakes.

Into a bowl put the egg, sugar, oil, and creme fraiche, and mix it all together.
Next, peel the pear.
Cut the pear up into small pieces.
Gradually, add the pear, chocolate chips, flour, and salt and mix until just combined, and then add the baking powder and mix together.
Spoon the mixture into another set of greased and floured tins, and place in the oven (same heat settings as before) to bake for around 30 minutes.

And this is the end result:


I hope you've enjoyed this post and you should definitely try making the cakes because they are extremely yummy! Technical term obviously! 

Isn't life in miniature more fun?!

Kate
xxx

Saturday, 14 July 2012

Healthy Cake...?

Healthy cake I hear you ask...surely that can't be right?! Well it kind of is! The cake in questions is known in the Appleby household as Slimmers Loaf and is a fruit tea loaf. 

It is made with weetabix so is full of fibre, there is no fat in it because there is no butter added, the binding element is skimmed milk, and then it is full of dried fruit! So, you can indeed eat cake and not feel too guilty!

The Ingredients:


 Wheetabix (as you can see it doesn’t have to be the actual brand!), dark brown sugar, cranberries (or if you prefer mixed dried fruit, or simply raisins, or sultanas etc.), self-raising flour, and milk.

There are no weights but rather I use a mug to measure everything – it doesn’t really matter what size mug but as long as it is the same one for all the ingredients its fine.
Crumble the weetabix into the mug, all the way to the top and then tip into a bowl. Then half-fill the mug with the sugar and add that to the weetabix.
 Next measure out the cranberries (a full mug) and add to the other dry ingredients in the bowl.

 Next add a mug of flour and then a mug of milk.
 Then stir it all together. I realise it doesn't look that appealing at this stage but once it is cooked it tastes lovely!
 Tip the mixture into a loaf tin and bake for an hour.
 And this is the end result!
  It can either be eaten plain or spread with a bit of butter, and is beautifully sticky and fruity! 

I hope you enjoyed this post and I would definitely recommend you try making it (I will add the recipe to the page as soon as possible).

There are several more food posts to come, and then (fingers crossed) some very exciting news next week! Keep reading!

Kate 
xxx

Thursday, 12 July 2012

The glamourous life of someone trying to start their own business...

At 12.16am I am sat trawling through commercial property websites yet again. The whole process is starting to get more than a little bit demoralising. It is at points like this that I really do start to think that I am doing entirely the wrong thing.

As my friends celebrate getting new jobs or worrying over interviews, I am sat watching daytime tv and helping my mum with the ironing as I wait to go and view places and carry on my desperate search of websites. My life now seems to revolve around commercial property websites!

Surely I should have been applying for graduate jobs or a masters course somewhere?! My brother certainly seems to think so anyway!

On the viewings I've gone on so far you can tell that people think I am far too young! On Monday the woman asked if I was actually looking for premises or if it was simply some research for the future - who thinks you'd put yourself through this much stress in order to carry out research for the future?! What exactly would be the point in doing that, its just a wastes of everyones time!

I've viewed two places so far and neither seem right. Its not that I'm being picky but I believe the right place is out there somewhere and I will know it when I get there. If you read my post The First Viewing then you should be in agreement that that was simply a no no! The second place on Monday was better but didn't actually have a kitchen! Cheaper to buy but a fully fitted kitchen won't come cheap! Plus it wasn't that big, and while I know I can't go over the top size-wise I still want somewhere that will actually make some money! I would like to be able to move out of home at some point!

I have my third viewing tomorrow morning (at 9.30am - means I need to leave home at 8.30am...), which looks interesting. It appears to have a kitchen! Indeed it is bigger than the other two places and in a decent area, but it is also cheaper, which makes me start to wonder why! Then on Monday I have another viewing, which again looks like an interesting possibility.

So slowly but surely I am getting the wheels in motion, but I'm scared that they might be coming to a stop again soon if neither of these places are right. I'm not saying I would give up though! I'm made of stronger stuff than that! If I can get through Bronze D of E (trust me, if you knew me you would understand the hilarity of that statement!) then I can get through anything in my opinion!

Anyway, there are the early morning ponderings of a girl struggling to make sense of all this business malarky! I've tried all day to write a post on food and nothing has worked but then I manage to write this now - my brain is a funny thing!

Now, it is 12.36am and I should really go to bed - I have an early start in the morning! Wish me luck as I carry on my journey and I hope you keep reading - there will be several food posts over the weekend as I did a whole day of baking on Wednesday and lots of tasty things were made!

Night (or rather morning!),

Kate
xxx

Monday, 9 July 2012

Really rather nice and only a tiny bit naughty!

Yesterday I promised a post that was actually about food, and so here it is!

A favourite pudding in the Appleby household is Lemon Curd Syllabub. It is really easy and quick to make, but more importantly it tastes amazing! When I find a recipe I like, I try and modify it slightly or play around with the ingredients, and this one is wonderfully versatile! I've used the same basic recipe but found different varieties of curd, so there has been raspberry curd, blackcurrant curd, and lime curd syllabub. My mother bought some banana curd and hinted that she thought it might be a good addition...I so far haven't tried it! If I ever do, I will of course let you know how it turns out!

I will put the full recipe on my recipe page so on here I will just put the basics. In the original recipe wine is added but I don't do so. The only reason being that I don't feel it is particularly necessary! If you want to do so though, you absolutely should!

The Ingredients:

 Shortbread biscuits, double cream (but as you might notice I actually use Elmlea, Elmlea Light to be precise), mascarpone, icing sugar, lemon curd, and flaked almonds. 

If you continue to read my blog, you'll find that in most recipes I use low-fat substitutes, such as elmlea here, and also lighter mascarpone. Basically, I'm not very good at not eating the things I like so I make myself feel better about it by making some of the ingredients a tiny bit better - who am I kidding?! I'm sure there are plenty of people out there that can relate though!

How its done:

Combine the cream and the mascarpone
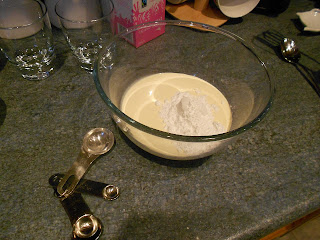
 Add the icing sugar
 Whisk it all together until it forms soft peaks - it doesn't want to be too thick; it should still move!
 
 Next, add the lemon curd
 Mix it into the creamy mixture so it makes swirls through it
 Crumble the shortbread between the glasses (in my case three, although technically the amounts in the recipe serve four...sssssshhhhh!)
 Spoon the mixture into the glasses on top of the shortbread and then scatter a few flaked almonds over the syllabub. If you want you can add a blob of whisked double cream on top, or even just squirty cream if you so wish!
 Finish with a liberal dusting of icing sugar and enjoy! (Sorry the glasses are a mess!)

I realise this isn't actually baking, but I do love a good dessert! I recommend you all try making it because I guarantee you will enjoy it!

I would love to know what you think of it so please leave comments!

Kate
xxx