Monday, 17 September 2012

A few recent things

A picture post of some of the things I've baked recently!

Chocolate Cake with Chocolate Icing and Milk, White, and Dark Chocolate Decoration

Poppyseed Plait 

Mozzarella and Pesto Puff Pastry Tartlets

Malted Milk Whoopie Pies with Vanilla Cream

Mocha Madeleines 

Orange and Almond Cake

Chocolate Cake with Chocolate Icing and Pearl Decorations

Bacon and Cheese Flan

Chocolate and Cherry Macaroon Slice

 Miniature Lime Syrup Loaf Cakes

Vanilla Hearts

 Classic Cherry Cake with Sugar Lumps

Chocolate Post #1

I am a lover of chocolate and I'm not (too) ashamed to admit that fact! Therefore, I thought I would do a few posts that are all to do with different things I have recently made that all feature chocolate very heavily!

The first one is Chocolate and Raspberry Mousse with fresh raspberries. I made it on Sunday night for the first time and it was really rather good even if I do say so myself!


The Ingredients:

Dark chocolate, condensed milk, double cream, salt, raspberry liqueur, and raspberries.

Start by melting the chocolate in the microwave - be careful not to let it burn.
 Pour the condensed milk and cream into another bowl, and add a pinch of salt.
 Whisk the mixture until it thickens. The whisks should leave a ribbon when they are lifted out of the bowl, so don't over whisk!
 To the cooled chocolate add a third of the cream/condensed milk mixture and stir it all together.
 Then very carefully spoon the chocolate mixture (in at least 3 batches) back into the cream mixture and gently fold in.
 Then add the liqueur and mix in gently. 
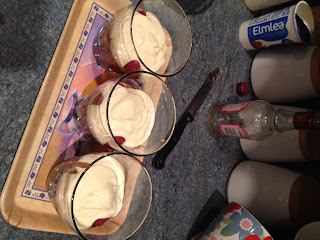
Spoon the mixture into glasses (in this case three) and put in the fridge for about an hour.
 When the mousse is ready to serve, whisk some more double cream for the top. I left it quite runny, just as personal choice!
 Spoon some raspberries onto the top of the mousse.
 Cover with the cream.
 Then I finished them off with a bit of chocolate powder.
And there you have it, a beautifully sweet and boozy chocolate mousse!

An extremely tasty treat, and as I made it with Elmlea and light condensed milk, it was healthier than some things! 

As an aside, I am going to make sure my recipe page is up to date with all the things I've done posts on so far, so please consult it if you want to make anything!
Also, please follow me on twitter if you're interested in anything I'm doing and you'll get to know more about me! If you want to ask me anything/tell me anything then please do! 

Hope you keep reading!

Kate
xxx

Thursday, 13 September 2012

Who needs posh macaroons?

When someone mentions the word macaroon these days, we automatically imagine the beautifully crafted and awfully expensive creations of the French, and yet by doing so we miss out on a whole range of other lovely treats that fall under the header macaroon.

Now if you don't like coconut you aren't going to like these at all I'm afraid! It is coconut, chocolate and cherry macaroon slice, and it is a wonderful chewy treat - perfect for lunch boxes as many cookbooks like to say!


The Ingredients:

Egg whites, caster sugar, chocolate chips, glace cherries, coconut, and plain flour.

The first thing to do is separate the eggs - egg whites are crucial for the meringue of a macaroon but the yolks aren't needed - you could keep them for another recipe if you want though.
Whisk the egg whites until stiff peaks have started to form and then gradually add the caster sugar, a little at a time.
Once all the sugar is whisked in (you should have a really silky smooth looking mixture that stands in stiff peaks), add the chocolate chips, coconut, cherries, and flour.
Mix it all together so the mixture looks like it does below.
The tin required for this should be shallow and rectangular - a swiss roll tin is perfect. Make sure it is well-lined with baking parchment - leaving plenty over the sides so it can be removed easily.
Cook in the oven and remove when it is starting to brown.
When it is cold, melt some more chocolate and drizzle it over the top.
 Cut into pieces, serve, and enjoy!

Kate
xxx

Ginger and Lemon - a perfect combination

I’ve been away from my blog for quite a while now, so I thought I had better get back on top of writing posts! I seem to have been busy but I’m not entirely sure what I’ve been up to! There is still work to do at my mum’s business premises so that has kept me occupied (my dad caused a flood last weekend, which needed to be sorted out!), and more importantly my lovely and beautiful friend Rach (finally) returned from the Dominican Republic and so she has been keeping me busy what with trips to Weatherspoons and a wedding (lots of fun!) – I can’t complain I suppose!

Now I realise I started this blog in order to report on my progress in setting up my own business but as there is nothing currently to report I shall carry on with a few more posts on some of my new/favourite baked items! As soon as something is going on (which fingers crossed will be the case very, very soon!) you wonderful readers will be the first to know!

So, on with the cake…
My mum is a massive fan of anything that involves ginger and therefore one of her favourites is the cake in this post – sticky ginger cake with lemon icing. It is a beautifully dark and rich cake that is complemented perfectly by the cool, citrus icing that covers it. It is perfect with a cup of tea on a horribly cold day! 


The Ingredients:
 Butter, brown sugar, ground ginger, ground cinnamon, treacle, golden syrup, eggs, milk, bicarbonate of soda, and plain flour


Put the butter, sugar, golden syrup, treacle, ginger, and cinnamon into a large bowl and place in the microwave to melt it all together.

 In a separate bowl beat the eggs, and then to them, add the milk and the bicarbonate of soda dissolved in water. Pour this mixture into the melted butter mixture.

 Next add the flour and combine thoroughly.
 Once again I am using a trusty rectangular silicone mould, which doesn’t need greasing or lining, and the mixture can simply be poured in.

 Cook in the oven at 180 degrees centigrade for around 45 minutes to an hour, and then leave to cool before icing.
 The icing is a simple mixture of icing sugar, lemon juice and water. It needs to be fairly thick so it can be spread over the top of the cake.
And there is the finished product (also shown at the start), all ready to eat and enjoy!

Hopefully people will come back and read my posts again! Sorry for being away! 

Kate
xxx