Thursday, 8 November 2012

Happy Halloween!

So the post itself might be a little late, but I did in fact spend the 31st October baking Halloween goodies! Halloween has never been 'celebrated' in the Appleby household, except for one year (many years ago) when we just happened to be in Salem for the night - spooky! However, I still use it as an excuse to bake, but lets face it I use anything as an excuse to bake! This post is for spiced cupcakes with spiced cream cheese frosting - far too good to give to anyone who is trick or treating! The cupcakes are rich and dark because they contain a large amount of treacle while the frosting is cool and creamy with a slight kick from the spices - the two compliment each other perfectly and make a very satisfying treat on a cold Autumnal day! 


The Ingredients
 Butter, dark brown sugar, treacle, eggs, plain flour, bicarbonate of soda, and ground mixed spice.

 In a large bowl cream together the butter and sugar until it is pale and fluffy, and to it add the treacle.
 Next, lightly beat the eggs and combine with the butter mixture.
 Gently fold in the flour, bicarbonate of soda, and mixed spice, using a metal spoon.
 Spoon the mixture into paper cases and bake until well risen and beginning to crack on the top.
 Leave the cakes to cool slightly in the tin, and then transfer to a wire rack. When they are completely cool, make the frosting.
 For the frosting: butter, icing sugar, cream cheese, ground cloves, and ground cinnamon.
 In a bowl combine the butter, cream cheese, and spices.
 Then add the icing sugar and beat thoroughly.
 You will end up with quite a runny mixture, so I put it in the fridge for about an hour/hour and a half before I used it.
 Once it has been in the fridge, and therefore thickened up and set slightly more, spread the frosting over the cupcakes, and then decorate. I used Halloween themed cake-toppers, but you could use whatever you fancy.

And there you have Halloween themed spiced ginger cupcakes with spiced cream cheese frosting - perfect on a cold October night! 
The perfect treat involving very little trickery!

Kate
xxx

p.s. I had a lot of the frosting left over so I made a carrot cake to use it up - also a very good combination!

Yet another post involving apples!

Firstly let me apologise for the number of recent posts that have had apples as the main ingredient. It hasn't been deliberate or planned I promise! I am quite a fan of apples though as I said in my last post! The item in question is cheese and apple bread, and it is beautiful! When I came across the recipe I knew I just had to make it, and when so many people commented on the photo I posted on Facebook, especially one lovely person in particular who specifically requested I write about it on here, I just felt I had to! 

The Ingredients
 500g strong white bread flour, 10g salt, one packet of instant yeast, 300ml cold water, olive oil (for kneading), 150g cheddar cheese, and 2 apples (Granny Smiths work well).

 In a large bowl combine the flour, salt, and yeast.
 To the dry ingredients gradually add the water.
 Mix together to form a dough and then turn out on to an oiled surface and knead for five to ten minutes. The dough should be smooth and elastic.
 Form into a round and place the dough in an oiled bowl and cover with a tea towel. Leave to rise in a warm spot for 1-3 hours.
 Once the dough has risen, it should be double in size, prepare the apples. They need to be peeled, cored, and chopped into small chunks.
 Do not knock back the dough, but rather shape it into a rectangular(ish) shape - the length should be double the width.
 Cover one half of the dough with the apple, leaving a fairly wide margin round the edge.
 Sprinkle the grated cheese over the apple. 
 Fold the dough over to make a parcel and seal the sides. Place the bread on a baking tray, cover, and leave to prove for another hour.
Once risen for the second time, dust with flour, and then make the holes in the top of the loaf by simply pushing your finger through the dough. Cook in the oven (220) for 30 minutes, until golden brown in colour. When its done, take it out of the oven and serve it - or just eat it all yourself!

And there you have it. The end result is as gorgeous as it looks! 
The bread is crisp on the outside and fluffy within, and the centre is a gooey mass of rich cheese and sweet crisp apple. 
It most definitely needs to be eaten warm - although be careful not to burn your mouth on the very hot cheese!
It needs nothing with it, that would just spoil it, so cut it into pieces and enjoy as much of it as you like! Trust me, you won't be able to resist!

Kate
xxx

Tuesday, 30 October 2012

An apple a day keeps the doctor away...

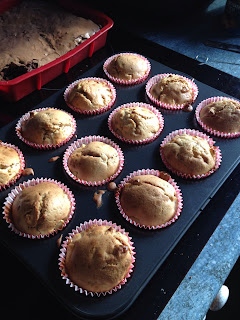
My favourite fruit is definitely apple, but I am quite fussy when it comes to finding the right type. They must be really firm and crisp, and I won't touch red delicious! I just don't like them! I hate it when you bite into an apple and it has that awful powdery texture and taste - absolutely disgusting! I went through a phase of really disliking any form of cooked apple, which thankfully I am now over and so in this post I bring you toffee apple muffins. 

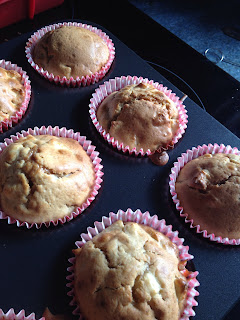
Whoever realised that toffee and apple are a brilliant combination needs a pat on the back! Not to mention the added bonus of cinnamon, which always reminds me of christmas whatever the time of year! These muffins are a really nice change from simply chocolate or blueberry, and have a lovely rich flavour, and a gooey centre thanks to the toffee. Make and enjoy hot or cold!


The Ingredients
Butter, caster sugar, eggs, milk, baking powder, salt, plain flour, ground cinnamon, apples, and toffee.

Line a 12-hole bun pan with muffin cases.
Melt the butter (just in the microwave) and add to it the caster sugar.
Then mix in the flour, baking powder, salt, and cinnamon.
The next thing to do is to peel, core, and chop the apples into small chunks, and stir into the other ingredients.
The toffee needs to be broken into smaller pieces - I used individual wrapped toffees, which I broke up with a toffee hammer (a very useful tool to have in your kitchen drawer).
Once broken up, the toffee should be kept on one side.
Put a tablespoon of the mixture into each of the muffin cases.
Scatter a few pieces of toffee on top and then cover with the remaining mixture.
Bake in the oven until the muffins are well risen and beautiful golden brown.
And there you have your muffins! The apple will have softened and the toffee melted in the middle - beautiful.

They make a lovely dessert if they are warmed through and served with custard and some extra toffee sauce.

Kate
xxx

Monday, 29 October 2012

Your morning coffee and cake all in one

Who doesn't love coffee? Well, me, actually! I know, know, the hilarity of the fact that I am opening a coffee shop and I can't stand to drink the stuff! Anyway, many people do like coffee, and while I don't like drinking it, I do like the smell of it and I can quite happily eat coffee cake (well, it is cake after all!), and so I thought I would make some miniature coffee cakes. I've said before that I love things in miniature, but there is just something special about having an entire cake all to yourself rather than simply a slice! Plus they are all the same size so no one can complain about someone having an bigger bit than them! My brother is so annoying for doing that! The recipe is really simple, just a standard victoria sponge with coffee added, and then downsized for your individual pleasure! Enjoy!


The Ingredients
Butter, caster sugar, eggs, self-raising flour, and coffee

Cream the butter and sugar until pale and fluffy.
Add the eggs and beat in well.
Then add the flour, but don't over mix.
Finally, make up some instant coffee, as strong or as weak as you like, and stir that in.
Once again, I am showing my love for Lakeland, by using their miniature sandwich tin. I am a serious fan of it! If you don't have one you could probably make them in a standard bun tin. Spoon the mixture into the prepared tin (I have fallen in love with cake release spray!), until about two-thirds full, and bake in the oven (180) for about 20-25 minutes.
When done, the cakes should have risen nicely and be a lovely golden brown colour. 
Remove from the tin and leave to cool. They need to be completely cold before they can be turned into sandwiches.
For the buttercream, beat together butter and icing sugar, and then add more instant coffee. I make the buttercream much stronger than the cake itself, so you have a light cake with a rich creamy filling!
Cut the cakes in half and spread one half with buttercream and then sandwich them back together.
I then finished the tops off with more buttercream and added a pair of chocolate coffee beans.
And there you have it!
Beautifully light and fluffy, and, like most of the things I make, incredibly moreish! Not a particularly good thing! But, lovely all the same!

Will be writing again soon so keep an eye out!

Kate
xxx